Help Center - BMGM.chat
Get started with BMGM.chat
In this help section, you'll find useful articles about the chatbot, how to use it, build chatbots, and install them on third-party platforms for yourself and your clients. If you need assistance, feel free to reach out via email.
Getting Started 👋
Full Dashboard Walkthrough
This video walks through the “must know” BMGM.chat features:
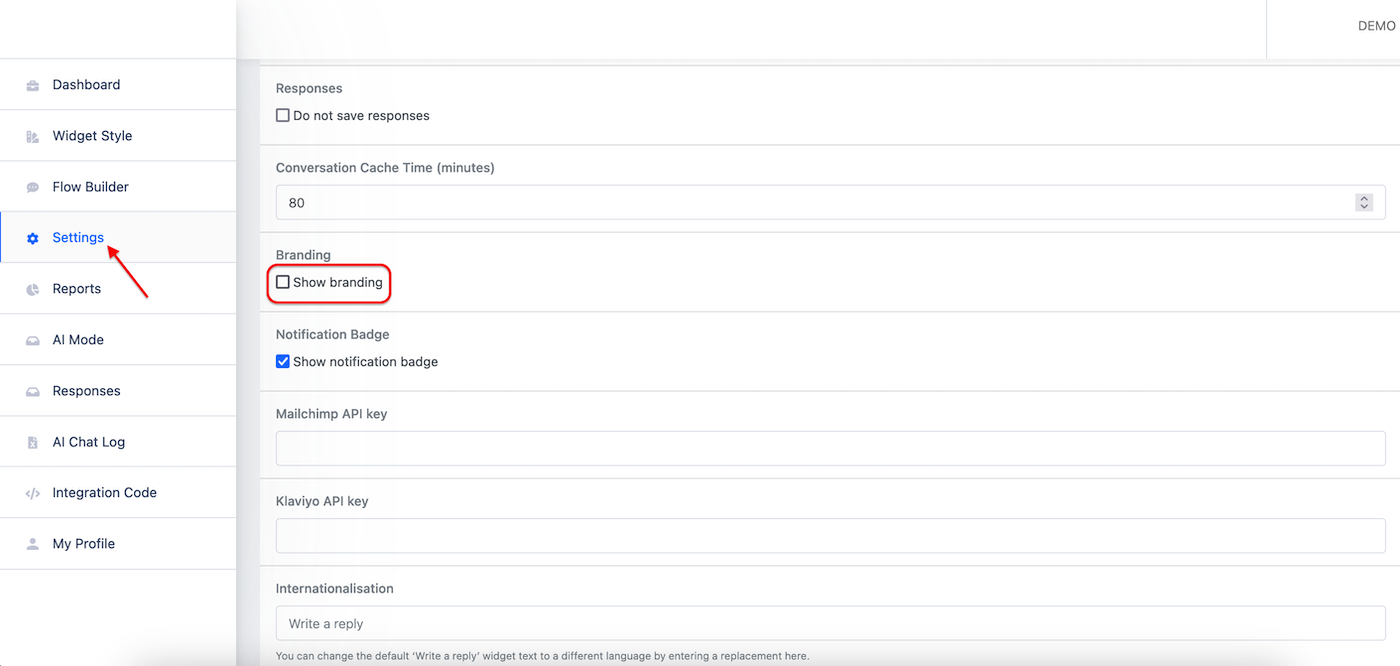
Removing 'Powered By' Branding
You can remove the “Powered By” logo and link in any bot to hide any mention of our brand. Load any bot in your account, and in the left sidebar choose “Settings”. Then, scroll down to “Powered By” branding. Uncheck the "Powered By" option to remove any mention of our branding.
AI Mode Overview
This walkthrough covers all of the AI mode essentials.
Can I grant clients access to edit their bot?
At BMGM, both direct clients and partner agencies can create and manage chatbots using our platform.
If you're a client, you can build your own chatbot or let us (or one of our partner agencies) handle it for you. You have full access to your account and can make edits to your chatbot anytime.
If you're an agency, you manage chatbots on behalf of your own clients. Please note: there is no second-level or sub-account access for your clients — you control the chatbot account, and your clients do not have direct login access. You are responsible for building, managing, and updating bots for them.
To deliver leads to your clients in real time, you can:
Enable email notifications inside the bot settings
Use integrations such as Google Sheets, Zapier, Make, Pabbly, etc., to push lead data directly into your client's CRM or systems
(See the Integrations section for more details)
💡Monetization Tip for Agencies:
The agency model allows you to charge clients a monthly subscription or retainer fee. You're offering a managed AI solution that includes all OpenAI usage costs, technical setup, ongoing support, and optimization — making your service more than just software, but a complete chatbot solution.
Can I change the Avatar & chat bubble icon separately?
You can change the Avatar & Chat Bubble image (you can even use a gif!) but you can’t change these independently of one another, currently. Whatever you change the Avatar to in the Widget Style settings of each bot will update both the avatar in the chat widget, and the actual chat bubble icon.
We do have plans to separate these out in the future, so stay tuned!
Let's built your first bot together
This walkthrough covers all of the flow builder essentials.
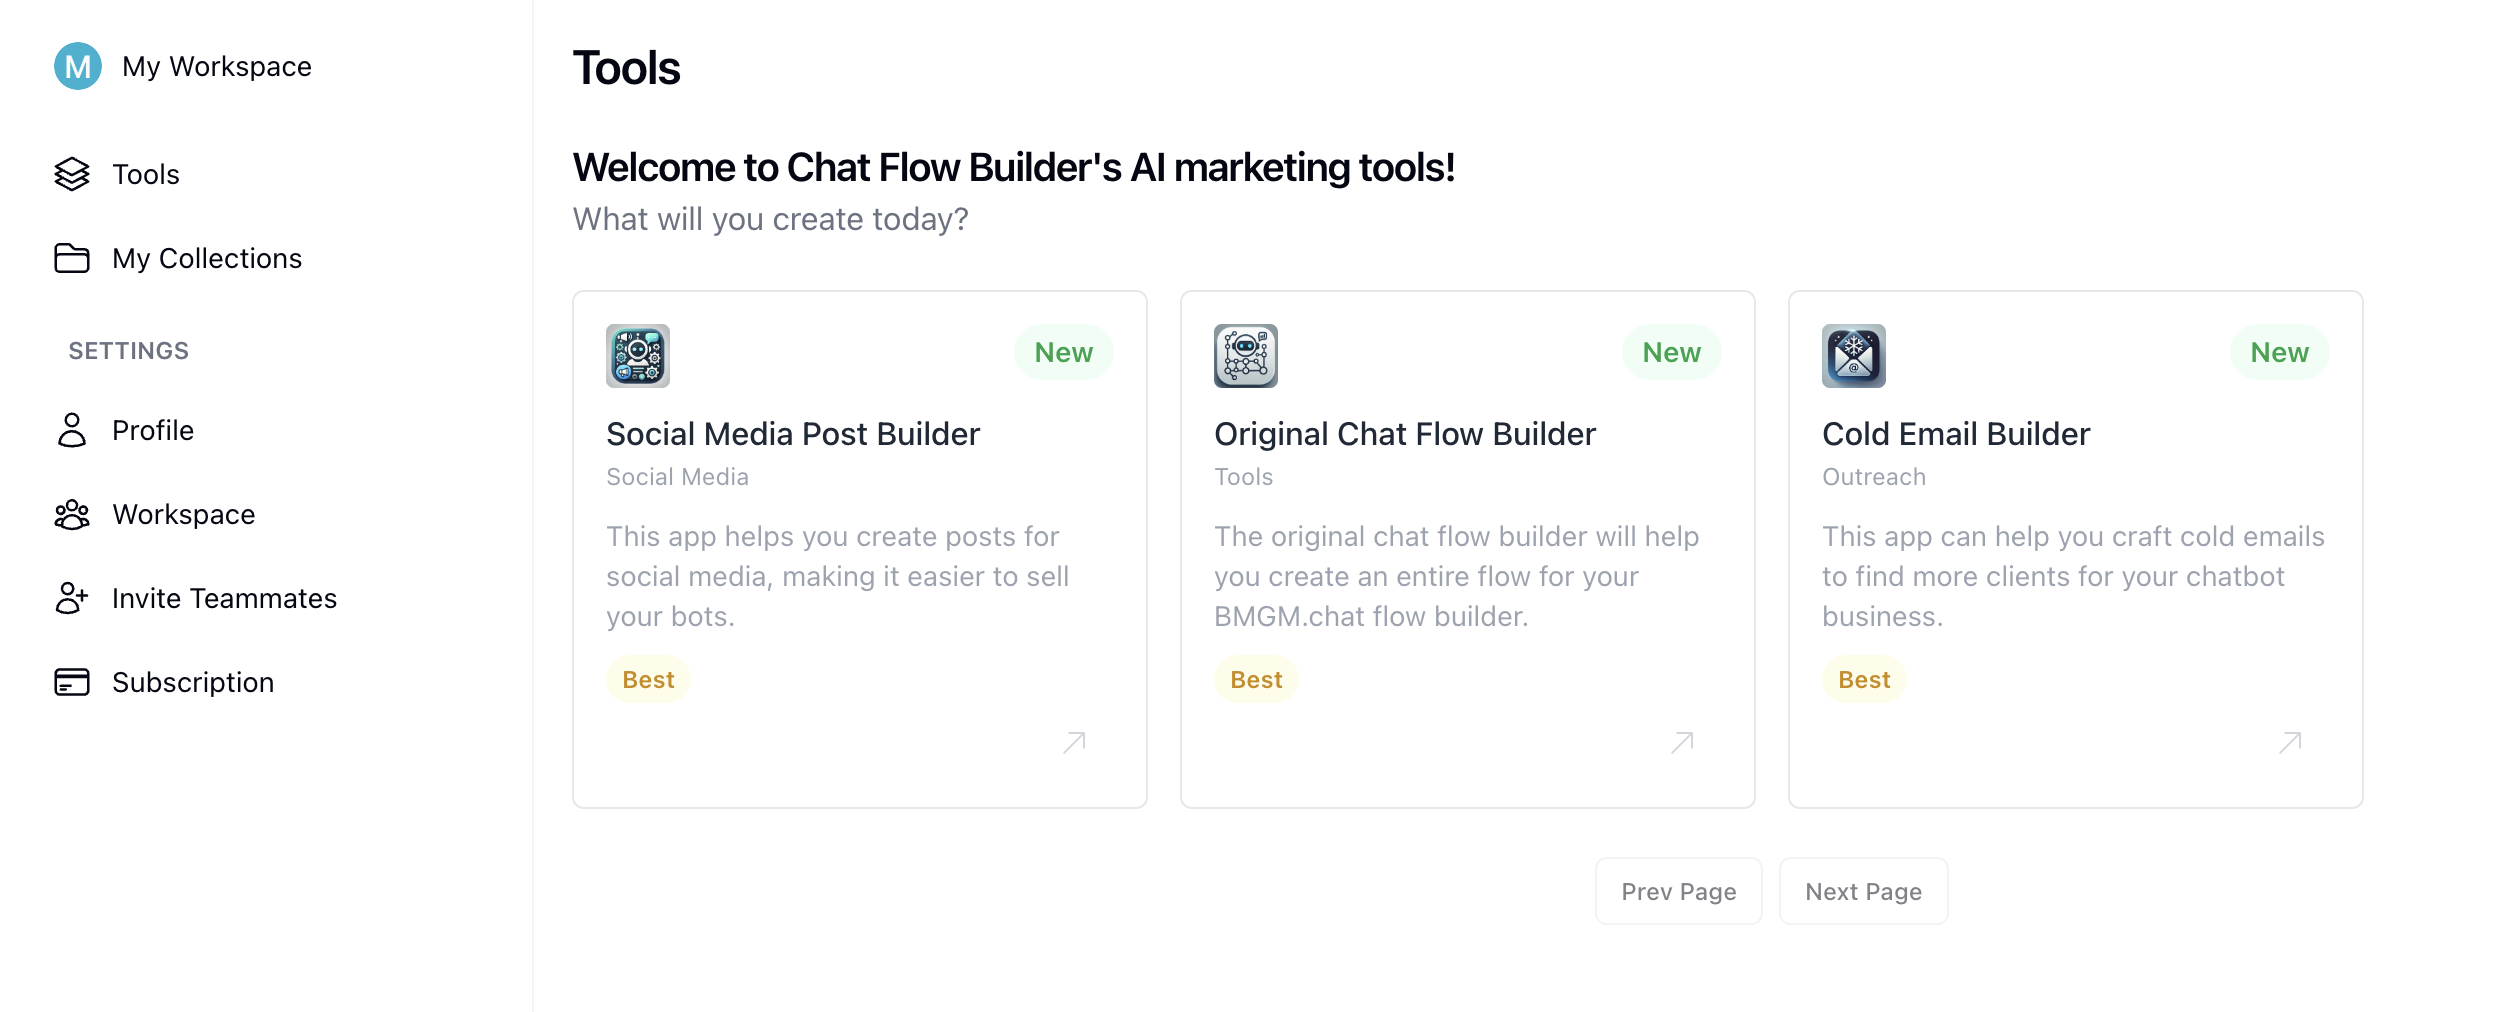
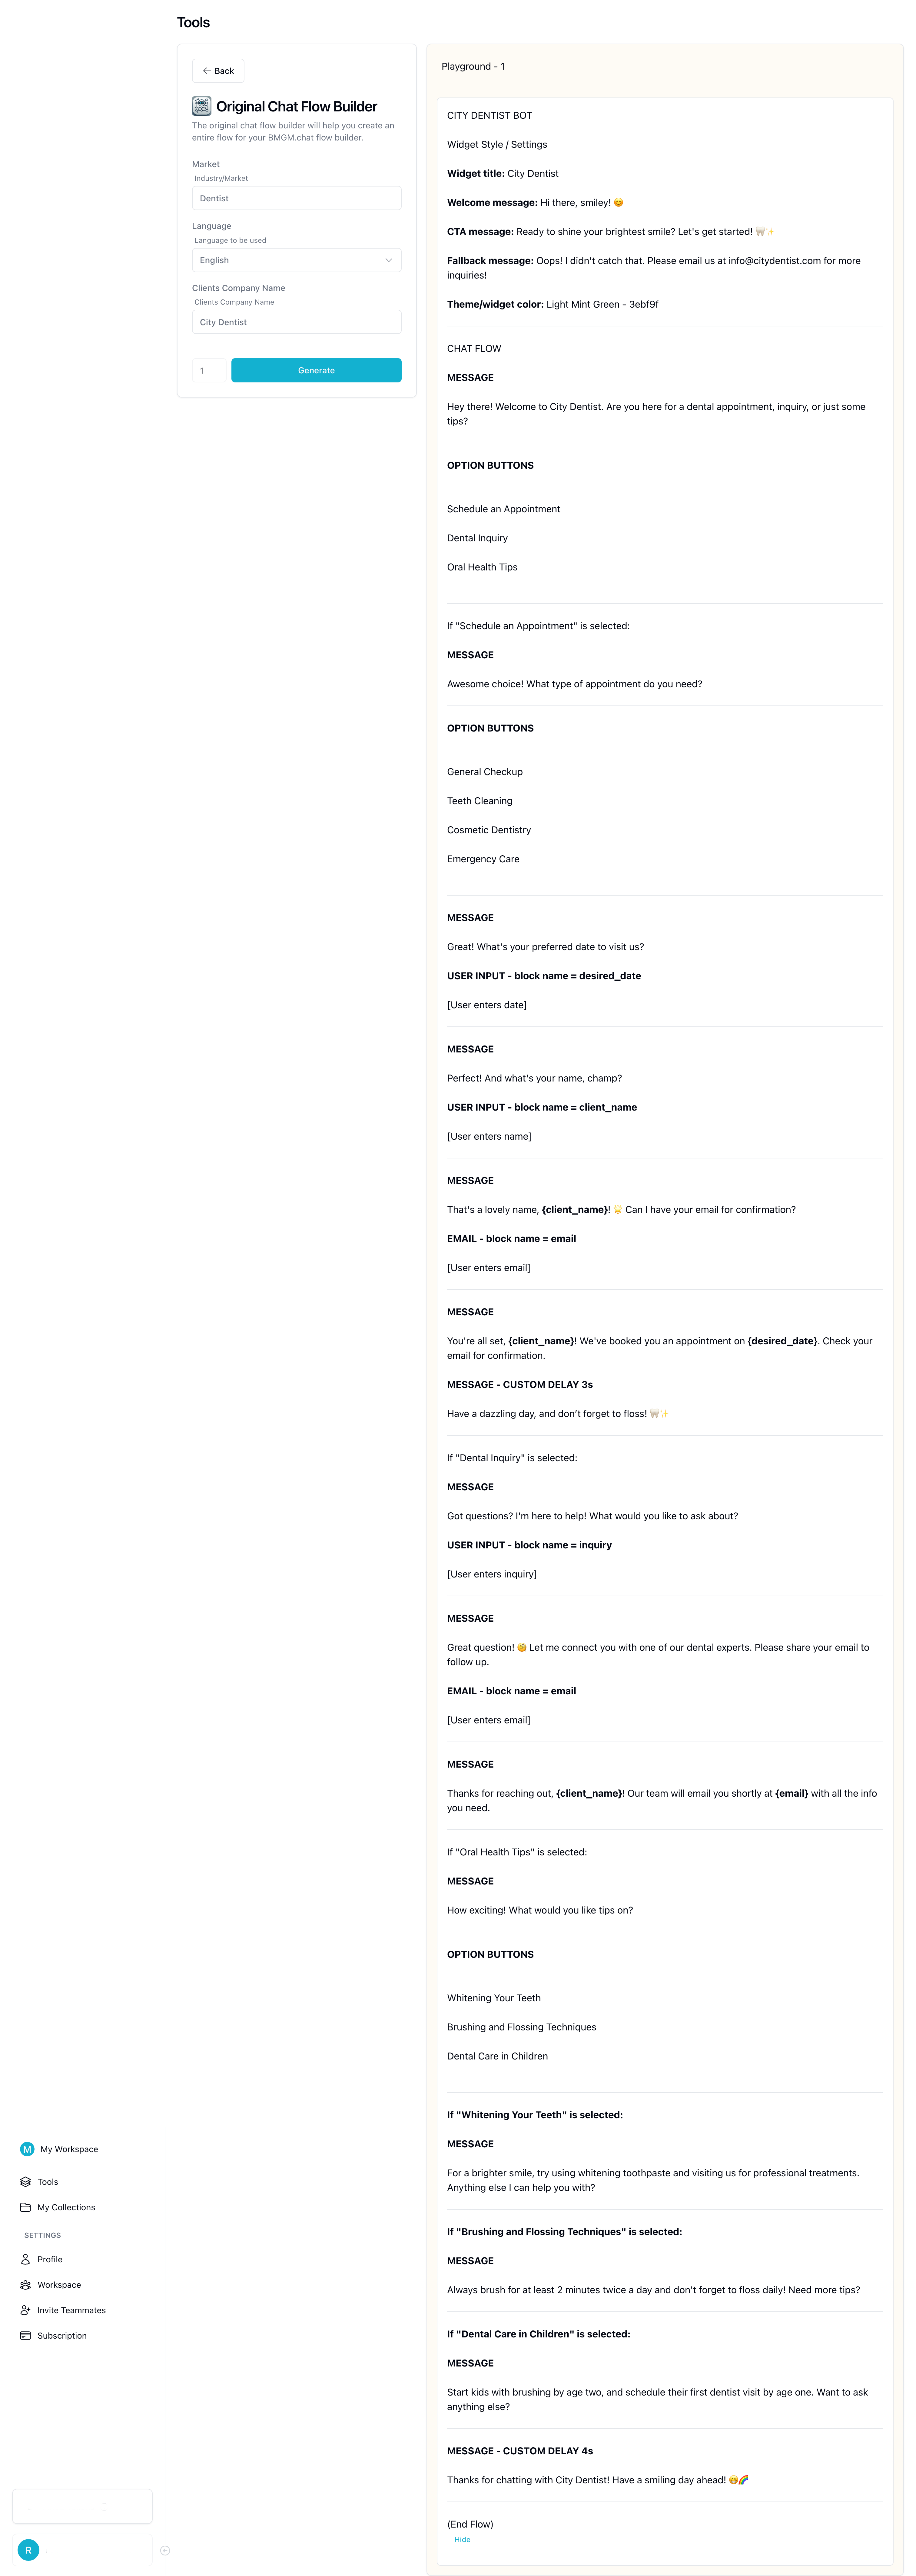
Bot Outline Using the Chat Flow Builder App
If you need help with ideas for building your bot across different industries, the Chat Flow Builder app is a great starting point. Plans begin at just $9 per month, and you can cancel anytime. Below are two screenshots showcasing the desktop view and an example for a dental practice.
You can sign up here: app.chatflowbuilder.com
Integrations ⚡️
Google Sheet Integration
We have a native Google Sheets integration. Here’s how to set it up!
Zapier Integration
Reminder: Integrations only work with Flow Builder based bots.
Here is a video tutorial for Zapier:
Troubleshooting
It's worth keeping in mind that the bot will only send data to any external app, including Zapier, in these 3 circumstances:
- At the point in a flow where an email address is collected, OR...
- At the point in a flow where the "Save Data" block is placed
- Whenever the timer for the AI block is hit, if you have an AI block
Important to note: if you’re using solo “AI Mode”, integrations do not work in that mode. You need to build your bot in the flow builder for integrations to work. You can still use AI in the flow builder.
For simple bots where you're collecting basic data, simply making sure you collect an email address after collecting other basic data (e.g. name, phone, anything else you want) is all you need to do.
For more complex flows or where you want to collect data after their email address, you need to insert the "Save Data" block after you're done collecting the required information. Once the flow reaches the "Save Data" point, it will push the data to Zapier (or any other app you're connected with).
Make.com Integration
Reminder: Integrations only work with Flow Builder based bots.
Learn how to use our Make.com integration.
Troubleshooting
If you’re having any issues with the Google Sheets integration, here are the most common reasons for NOT seeing data in Sheets:
Make sure you’re using a flow-based bot. Integrations do not work in the standalone AI Mode. Remember, you can now create AI bots in the flow builder.
Data is passed to integrations when either an email block is hit, a “Save Data” block is hit, or when an “AI Block” is present and the timer for the AI block is hit (you configure the timer in the AI Blocks settings), so be sure one of those scenarios applies. If you’re not using an AI block, consider testing with a Save Data block inserted at the point you wish to push data.
You can verify your integrations are working by seeing if the email notification feature works. Enter an email address in the ‘email notifications’ field in bot settings. Data will be emailed at the same time as any other integration data is sent, so this is an easy way to debug where the issue lies. Worth noting, sometimes custom domains block Mailgun, our notification mail partner, so try testing with a Gmail address or similar if you don’t see notifications with a custom domain.
If you determine the issue lies with Sheets itself, then there’s an issue in the setup. Rewatch the video above closely. Every step must be completed correctly.
The most common issues in the setup are with incorrect permissions being setup so pay close attention to that part. Also, triple check the sheet URL you place in the Google Sheet ID section is the correct one.
If all else fails, try to create a fresh integration with a NEW simple test bot (just collect something like name, email, and then save data) with a NEW Google Sheet, following the steps above again, to see if there is some unusual issue with a particular sheet or bot.
Webhooks & API
BMGM.chat does not currently have an API, but we do support webhooks for sending data to 3rd party platforms or custom integrations. To use a webhook, simply open any bot, go to the bots settings pane, and you’ll see 2 webhook fields:
- Zapier webhook
- Make.com webhook
Whilst these are labeled with Zapier or Make, they are NOT exclusive to those platforms.
You can use these fields with ANY webhook, from anywhere, including a custom application.
How to install the Bot 🤖
General installation guidelines
1.) Select a bot from your dashboard
2.) Navigate to the “Integration Code” sidebar menu
3.) Copy the Universal Integration Code
(unless you are using BMGM CRM, GoHighLevel or Groove - in that case, copy the GoHighLevel Integration code instead)
4.) Paste the integration code before the tag in whichever platform you are using, or in the scripts section of the website platform, usually referred to as footer scripts or body scripts (see below for tips on how to do this for different platforms, but you can always just Google “how to install custom scripts on 'platform name')
💡 If you have any issues with your bot not appearing, see this troubleshooting article for all of the possible scenarios this can happen, along with the fixes.
WordPress Installation
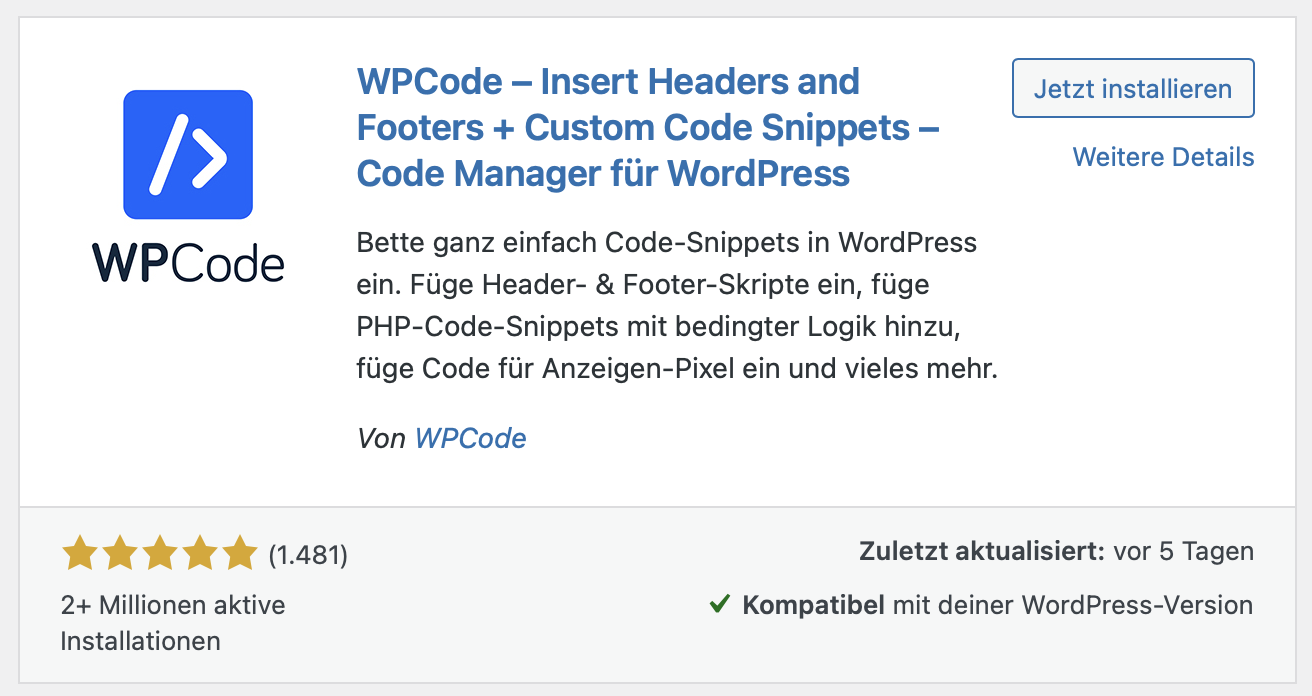
The easiest way to install the script on WordPress is using the free WPCode plugin. After installing the plugin, follow the tutorial here and place the integration script in the “footer” position (also known as the Body - End position).
Alternatively if you do not wish to use any plugins, in your theme editor, edit the footer.php file directly. Inside the footer.php file, place the integration code before the tag.
You need to disable Javascript caching & minification for our bots to work in WordPress. This will only be the case if you installed some kind of optimisation plugin, like SiteGround Optimise or WPRocket. If you have any kind of optimisation plugin, go into the plugins settings and disable all Javascript related features. Simply disabling the entire plugin is not enough due to caching. Go into the plugin and specifically disable any JS related options. See this troubleshooting article for more help.
GoHighLevel Installation
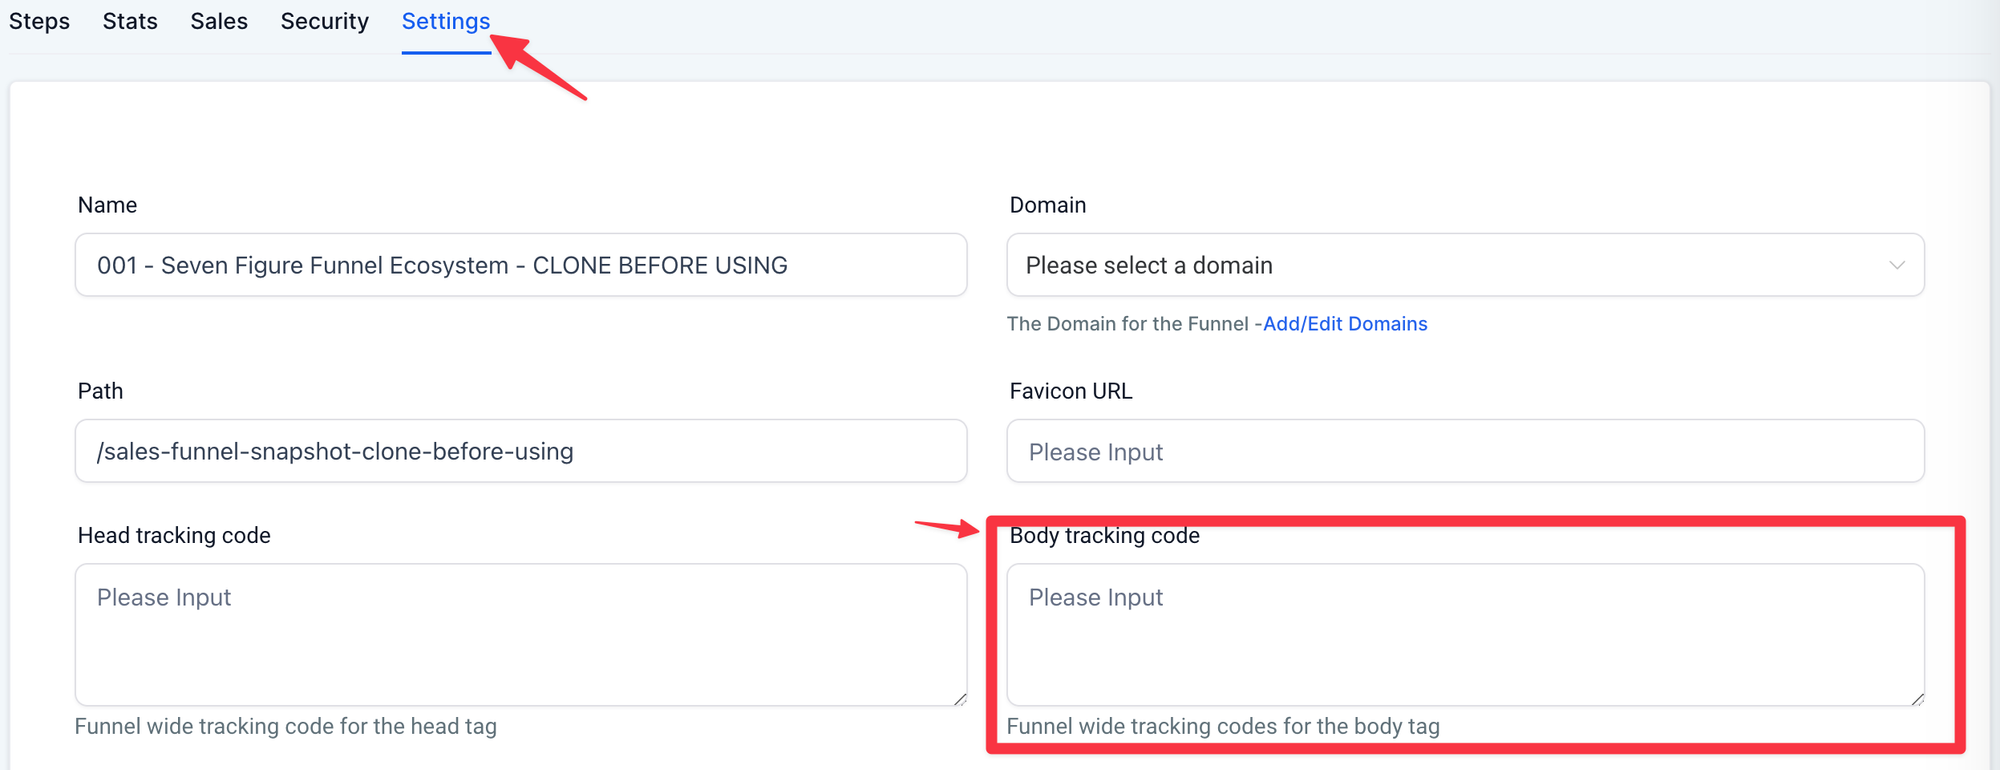
Open a funnel, click “Settings”, then paste the code in the “Body tracking code” section as shown below.
Then save your funnel and you’re all set!
Reminder: use the GHL-specific embed code, not the universal code.
Troubleshooting
If you’re having any issues with the Google Sheets integration, here are the most common reasons for NOT seeing data in Sheets:
Make sure you’re using a flow-based bot. Integrations do not work in the standalone AI Mode. Remember, you can now create AI bots in the flow builder.
Data is passed to integrations when either an email block is hit, a “Save Data” block is hit, or when an “AI Block” is present and the timer for the AI block is hit (you configure the timer in the AI Blocks settings), so be sure one of those scenarios applies. If you’re not using an AI block, consider testing with a Save Data block inserted at the point you wish to push data.
You can verify your integrations are working by seeing if the email notification feature works. Enter an email address in the ‘email notifications’ field in bot settings. Data will be emailed at the same time as any other integration data is sent, so this is an easy way to debug where the issue lies. Worth noting, sometimes custom domains block Mailgun, our notification mail partner, so try testing with a Gmail address or similar if you don’t see notifications with a custom domain.
If you determine the issue lies with Sheets itself, then there’s an issue in the setup. Rewatch the video above closely. Every step must be completed correctly.
The most common issues in the setup are with incorrect permissions being setup so pay close attention to that part. Also, triple check the sheet URL you place in the Google Sheet ID section is the correct one.
If all else fails, try to create a fresh integration with a NEW simple test bot (just collect something like name, email, and then save data) with a NEW Google Sheet, following the steps above again, to see if there is some unusual issue with a particular sheet or bot.
ClickFunnel
Open any funnel, choose “settings”, then place in the “body tracking code” field. Alternatively, open the design editor, choose the settings cog, and again place in the body tracking code tab.
Wix
Before you begin, make sure that your site is published and has a connected domain.
1.) Go to Settings in your site's dashboard.
2.) Click the Custom Code tab in the Advanced section.
3.) Click + Add Custom Code at the top right.
4.) Paste the code snippet in the text box.
5.) Enter a name for your code.Tip: Give it a name that is easy to recognize so you can quickly identify it later.
6.) Select an option under Add Code to Pages:
6.1) All pages: This adds the code to all of your site's pages, including any new pages that you create in the future. Choose
whether to load the code only once per visit, or on each page your visitor opens.
6.2) Choose specific pages: Use the drop-down menu to select the relevant pages.
7.) Under Place Code in choose: Body - end
8.) Click Apply.
Shopify
💡Info: Shopify does work, but it is not supported by us, since the system gets changed by them a lot.
1.) Open the “Themes” tab
2.) Click the “Customize” button on the right side of the screen
3.) In the lower left corner of the theme editor, click the “Theme Actions” dropdown button, then “Edit Code”
4.) Go to the “Layout” folder and click on it to display a .liquid files list, now click on “{/} theme.liquid”, this will now appear in the code editor
5.) Scroll to the bottom of the code and find the tag
6.) Place the integration code right before the tag
7.) Alternatively you can use a plugin like XO Insert Code.
If you encounter styling issues with your widget after installation, refer to the troubleshooting section for relevant help articles.
Please note: We do not provide support for installation or other issues related to bots installed on Shopify.
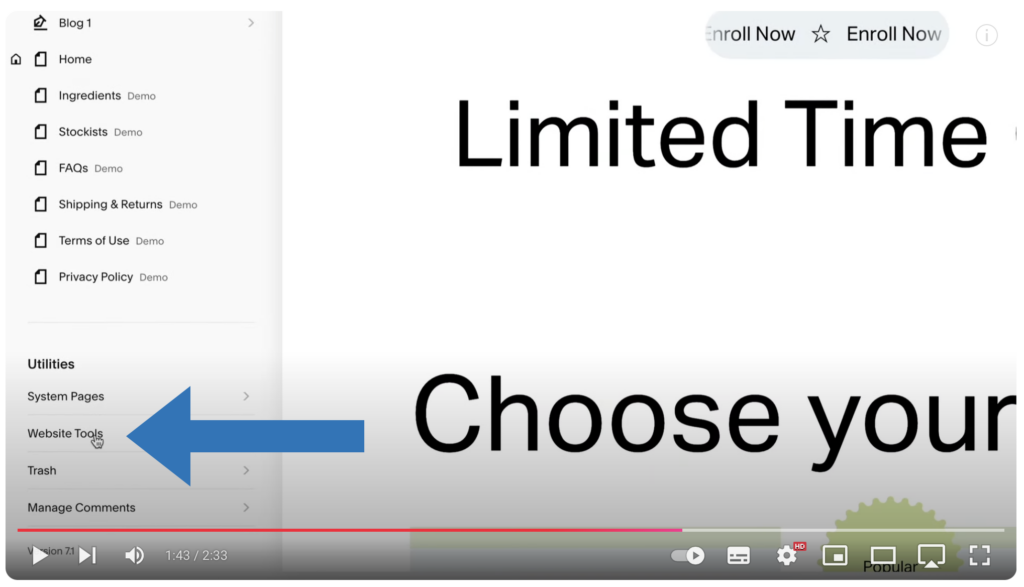
Square Pages
1.) Go to settings
2.) Scroll down to the utilities
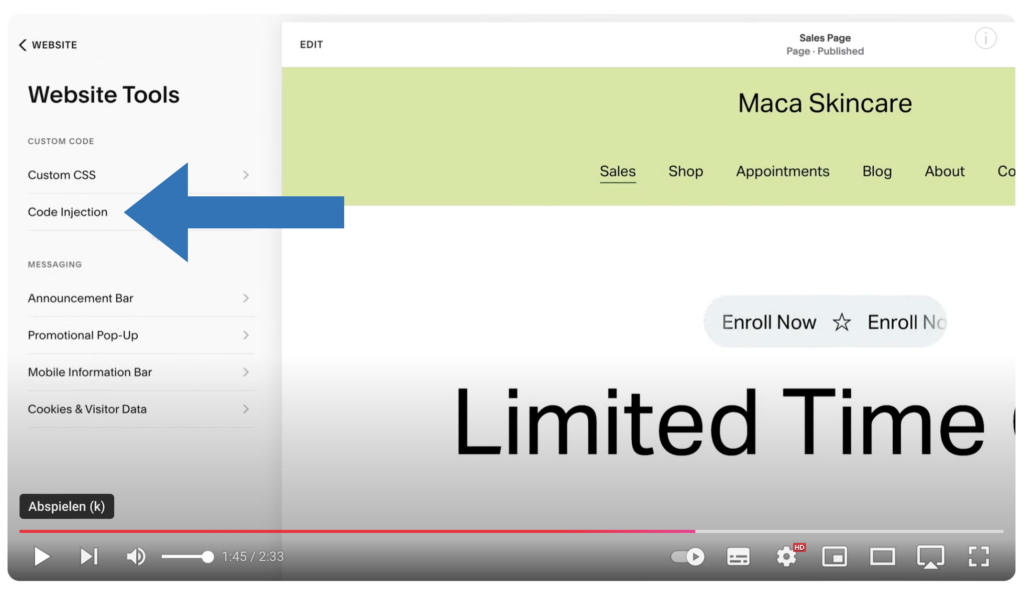
3.) Click on the website tools
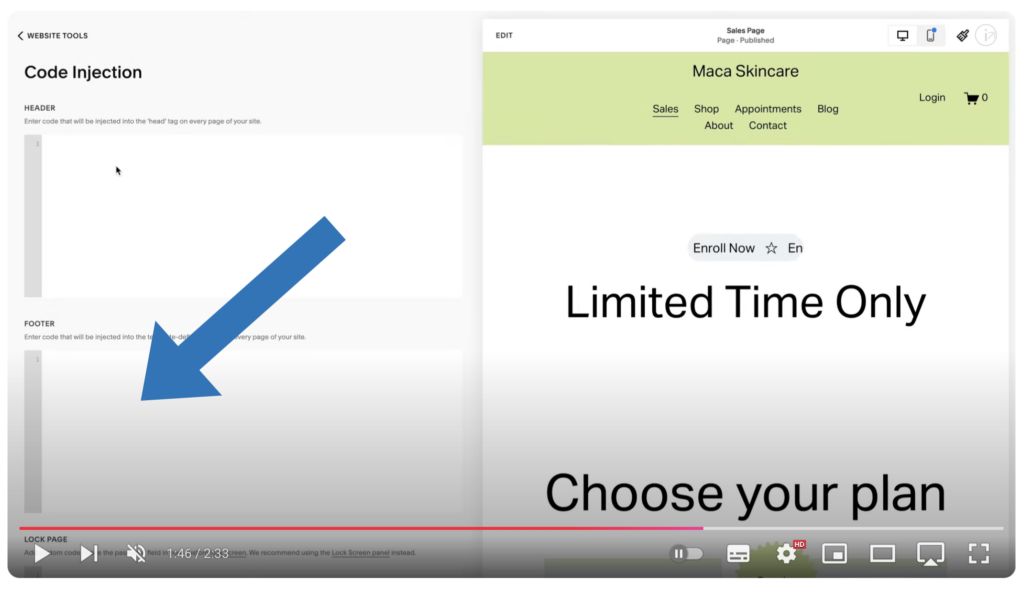
4.) Click on code injection
The option you want to use is “Code Injection”, in the “footer” position. Don’t use their HTML blocks, you need to use code injection like this help article shows:
➡️ Square Page Help Article
Click the picture below to enlarge them (if needed). They are screenshots from the video within the Square Space help article provided above.
Plattform not listed?
Most platforms follow a similar process to the above. Try different approaches and usually one will work.
Unsupported platforms
Currently, the only platforms we’ve found to not support our bots are: Durable.co, Google Sites & GoDaddy page builder. We have seen some people get inline embeddable bots working in Google Sites & GoDaddy page builder so it may be worth trying that (see below for inline embeddable bot guide) but we can’t offer support on this as these platforms are very limited.
Here you find a video tutorial:
Troubleshooting 🛠️
My bot isn’t appearing, or disappears
Here are the most common reasons for the bot not appearing or disappearing.
1.) Go into the bots settings, and make sure the ‘whitelist’ is blank/empty for testing, just incase that is the cause of the issue (this is the most common cause, it’s very sensitive)
2.) Verify the code is installed correctly on your site. Right click your site, click “View Page Source” in the right click menu, and then ctrl+F (Windows) or cmd+F (Mac) search the source code for the script. If nothing is found, the code is not installed. The code should be ideally installed before the tag on your site, but installing in the header may also work if this isn’t an option.
3.) If the code IS installed (you’ve found it in step 2 above) but you still don’t see the bot and you’re using a custom HTML site (not a website builder/platform), add this code to your header section, right after the element:
4.) If the code IS installed but you’re using GHL or Groove and it’s disappearing, make sure you’re using the GHL-specific integration code from the Integration Code tab in settings, below the Universal integration code
5.) If you’re using WordPress, the most common reason for the bot not to appear is due to a caching or optimization plugin - examples include WPRocket, SiteGround, etc. You must go into the relevant plugin and disable all Javascript related functions (JS caching, JS optimization, etc). Disabling the plugin is not enough, as your server will still load the last version. You must go into your optimization plugin and manually disable all JS optimization and caching features. Also ensure you have the bot installed correctly in the first place - you can use the free WPCode plugin to handle this if you’re not sure how.
6.) If you’re using Google Sites or GoDaddy’s website builder, neither of these platforms support custom code injection currently - instead, they embed custom code in a frame, which isn’t compatible with a floating widget, unfortunately. These platforms are intended for small personal projects, not commercial sites. The new inline-embeddable bot MAY work on these sites but is largely untested.
7.) If you’re using a local test environment (aka, testing without uploading your site to an actual server or platform), the bot will not load. It needs to be online, not local.
8.) After making any changes, test in a private browsing window (Incognito mode) to make sure you’re not seeing a cached version of the site
AI Not Responding
Scenario: When using the AI Mode Block in the flow builder, when the chat reaches the AI block, nothing happens, or the user has to ask twice for a response.
Answer: Check that the block directly before the AI Mode Block isn’t a “Question” block. It needs to be a normal “Message” block. If you use a Question block before an AI Mode block, a user would have to ask their question twice - once for the question block, and once for the AI Mode block. Therefore, you should just use a normal Message block prior to an AI Mode block. This could be a message like 'Now you can ask me any question' or something similar.
💡 Getting an OpenAI error message instead? That means OpenAI may be down! Check OpenAI’s status page here. They don’t always update for very small interruptions, or interruptions which have literally just started — but this error is an OpenAI error specifically.
Styling issues (hidden text, wrong colours, etc)
Styling issues are uncommon but can result when styles on your own site conflict with bot styles.
You can fix these by using some custom CSS on your site. Below are the most common issues. For larger issues, such as those that occur on Shopify, see this dedicated help article with styles for Shopify (may also work on other platforms).
Here is how the code snippet would look like for installation:
Common issues and the relevant CSS is below:
The text on the Call to Action “speech bubble” pop out is white/hidden, meaning you can’t see it
You can insert this as custom CSS on your site to fix it:

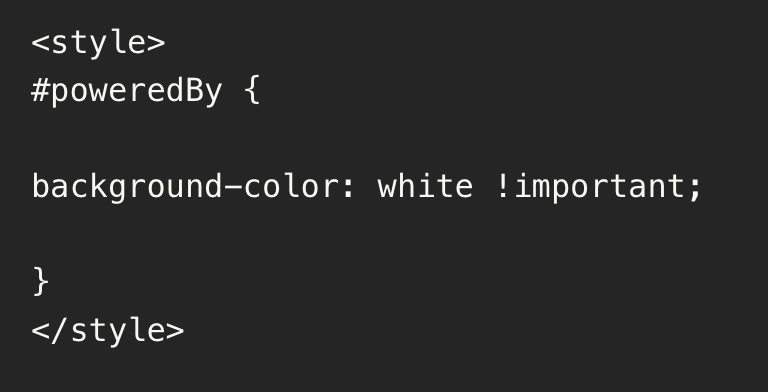
The area behind the “Powered By” branding/custom logo is grey, black or the wrong color.
You can insert this as custom CSS on your site to fix it:
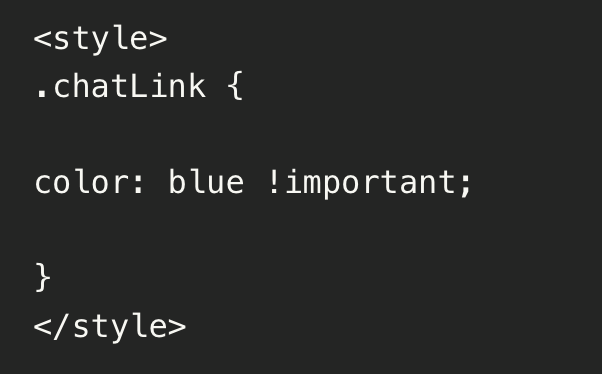
Chat links wrong color:
You can insert this as custom CSS on your site to fix it:
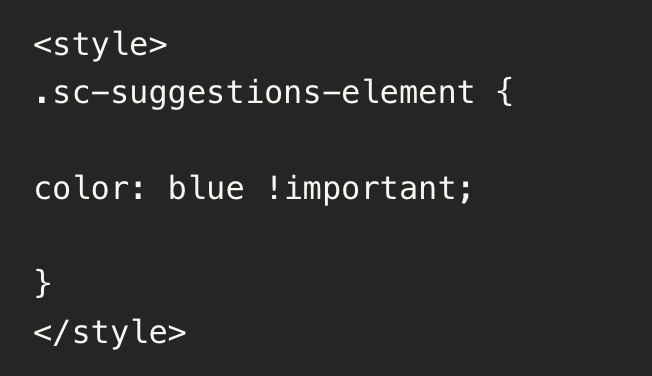
Button links wrong color:
You can insert this as custom CSS on your site to fix it:
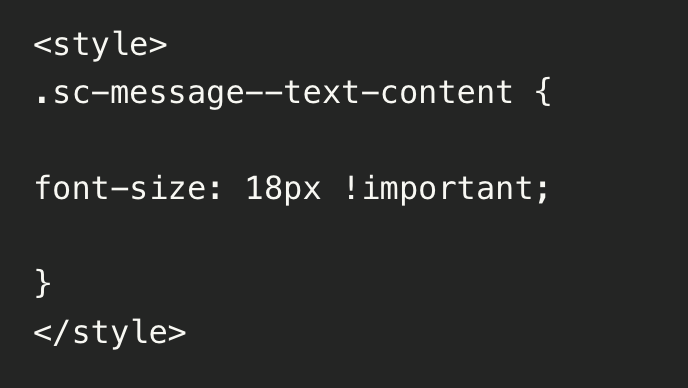
Font size needs changing:
You can insert this as custom CSS on your site to fix it:
Shopify Widget Issues
A small percentage of Shopify themes (a common one is 'Dawn') don't play nicely by default with our bots - the styling of the theme conflicts with the widget, and screws it up (text aligned the wrong way, sometimes not able to type in the chat box, etc). The fix is simple and we posting it here for reference only:
In your Shopify admin, go to Online Store > Themes.
- Click Customize.
- Click Theme settings.
- Click Custom CSS.
- Add your code [the code is below]
- Click Save.
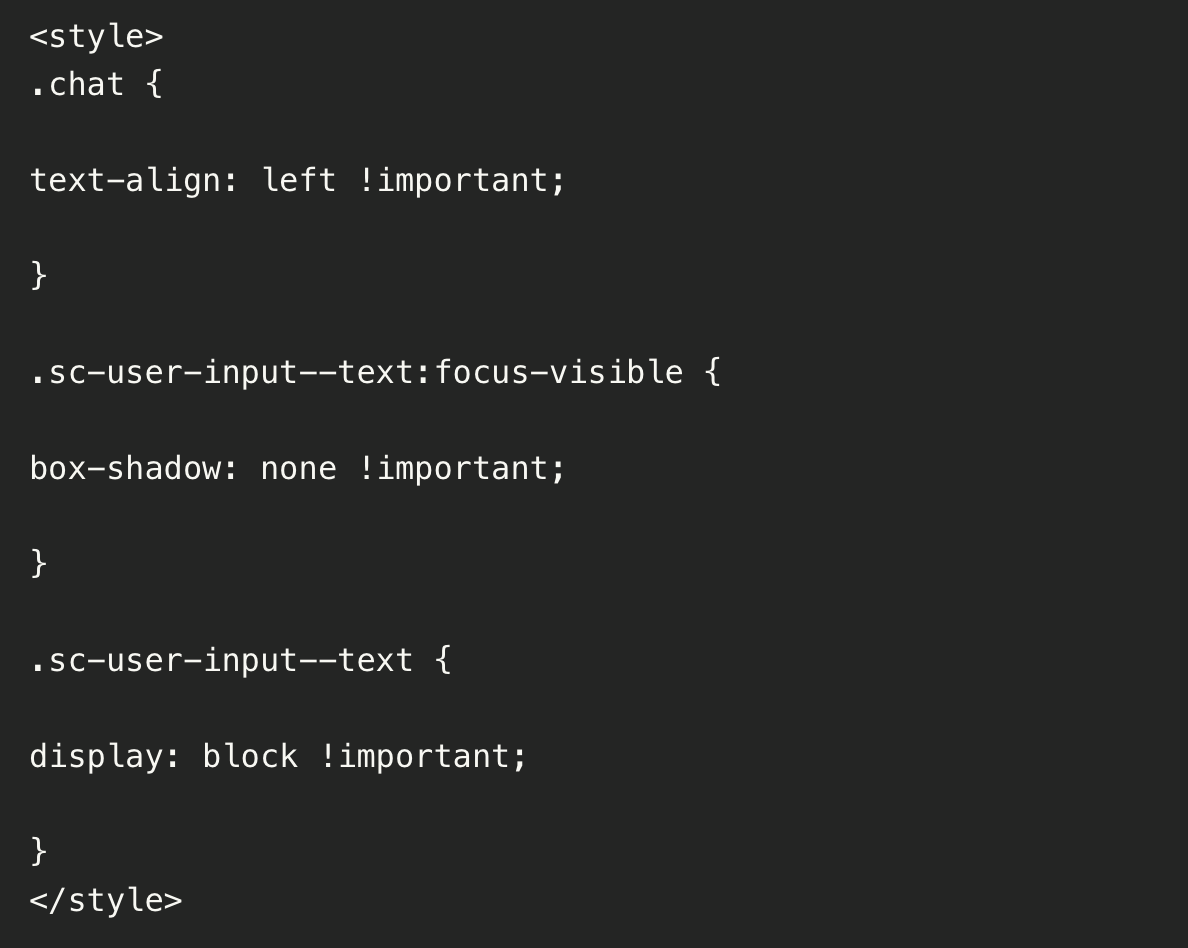
Missing data in Integrations
Data is passed to integrations in 3 scenarios:
When the email block is filled in (unless 2 or 3 below is present)
OR when a ‘Save Data’ block is hit
OR when an AI Mode block is hit (and the timer is reached, set within the block settings)
So if you’re missing fields or blocks, likely you need to add a Save Data block after the data you want collecting, or you could finish with an AI Block instead, which also serves the same purpose.
Advanced Mode URL Scraper/Crawler Issues
The URL scraping/crawling functionality for Advanced Mode lets you train our bots by entering the domain root (such as example.com), after submitting our bot will crawl the site.
If you’re experiencing issues with this feature, there are a few potential reasons why:
1.) The crawler can only crawl around 30 pages currently. This is enough for the vast majority of small business websites. If you need more, one option is to use one of the many “URL to PDF” tools on the market, many of them free (Google that “URL to PDF” term), and upload the data as PDF’s instead.
2.) If nothing is returned at all, the first thing to try is to refresh the page and try again.
3.) If nothing is returned still (or only 1 page is returned, the root), this means that either our crawler is being blocked (for example, our server we use for the bot software is in the UK, and some international sites, usually ones with regulatory issues, block UK visitors), or that our crawler is unable to navigate the page - you could right click and “view page source” of the website you’re trying to scrape to get an idea of what our bot sees… are all the links easily viewable?
4.) One other scenario we’ve seen is where there’s a pop-up which disables the site until something is agreed to (like an age verification popup on sites for alcohol brands), this also prevents out bot from navigating the site
5.) In the rare instances our crawler is blocked, you’ll have to train using a tool like URL to PDF, or simply use classic AI mode and copy/paste the context you’d like the bot to know about into the “business context” field.
We’ll continue to develop the crawling functionality over the coming months to overcome some of these limitations.
"Whoops, looks like we got disconnected” error message
Issue:
Users encountering the following error message when trying to use a chatbot:
"Whoops, looks like we got disconnected due to inactivity. Click the "Reset" icon in the top right-hand corner of this widget to restart the chat."
Clicking the reset button does not resolve the issue.
Cause:
Outside of the genuine scenario where this occurs (if someone was using the bot successfully but then hasn’t spoken to a bot for hours but left it open, this may happen, depending on cache length - in that case, resetting it will fix it), this issue typically occurs when there is nothing set up in the flow builder of the chatbot, and the "AI Mode" is not activated in the chatbot settings. As a result, the chatbot appears blank and does not load correctly.
Solution:
1.) Check the Flow Builder:
- Navigate to the chatbot's configuration settings and verify if you have content set up in the Flow Builder.
- If you are using a flow-driven approach, make sure the flow is configured correctly.
2.) Enable AI Mode:
If you're not using the Flow Builder and intend to rely on advanced AI responses:
- Go to the AI Mode tab in the chatbot settings.
- At the top of the AI Mode tab, check the box labeled "AI Mode".
- Ensure that you’ve configured the advanced AI features according to your needs.
3.) Restart the Chatbot:
Once you have either content in the flow builder or AI Mode enabled, click the reset button in the widget or refresh the page to restart the chat.
Summary:
- Ensure there’s either content in the flow builder or AI Mode is turned on.
- For users leveraging AI features, activate AI Mode by checking the "AI Mode" box in the “AI Mode” tab.
- After making changes, restart the chatbot to resolve the disconnection issue.
This simple fix should get the chatbot working correctly and eliminate the disconnection message.
General issues in the flow builder
This article contains general troubleshooting for issues that arise when using the flow builder (the chat flow editor).
First, you should use a modern, up to date browser such as Google Chrome — this is our recommended browser. Using a modern, up to date browser will fix a lot of issues.
Secondly, simply trying a different browser can fix a lot of issues… which often arise due to a local cache issue.
If your issue is that you’re finding it hard to navigate around a particularly large and complex flow, you can try zooming out in your browser using the “View” toolbar in your browser and then “Zoom Out” several times. Whilst we don’t have a native zoom in/out feature for the flow builder, your browsers own function can be useful for this in the meantime.
We are already working on an improved flowbuilder that makes navigating around larger flows easier.
That said, we highly recommend you keep flows as simple as possible, and use AI blocks to do heavy lifting in your flows. Also make use of “Loop” blocks to avoid building large flows that use many of the same elements.
For other issues relating to specific functions, see our troubleshooting section.
And for a general guide on using the flow builder correctly, see our getting started video.
Our getting started video shows how to use all of the common block types, and is a must watch to understand how the flow builder and the different blocks work.
Prompting Tips ⚙️
General instructions
You can achieve a lot with simple prompts, but the quality of results depends on how much information you provide it and how well-crafted the prompt is. A simple prompt can make your bot act as a bot, but a bot with a good prompt can vastly increase your human agency, build relationships and drive up business.
GENERAL HELP
Specifying Interaction and Flow Task
Specifying Interaction and Flow Task; specifying Instructions and Objectives Guidelines; Guardrails for the bot to abide by Best Practices in action Repetition Examples/Illustrations Advanced Prompting: Delimiters Conversation Context Writing styles Tone
Prompt Elements
As we cover more and more examples and applications with prompt engineering, you will notice that certain elements make up a prompt. You can use these elements to instruct the model more effectively to improve the quality of results.
Role specifying
Role; specifying Interaction and Flow - persona, directions and context that can steer the AI model to better responses. Defining the role plays a pivotal part in the coherence and relevance of AI responses.
Task; specifying
Task; specifying Instructions and Objectives - a specific task or instruction you want the model to perform, At the core of any successful prompt lies a well-defined task. Vague or ambiguous prompts might lead to your GPT bot hallucinating, or simply producing an outcome that’s not what you were expecting or which doesn’t meet your expectations.
Guidelines
Guidelines; guardrails for bot to abide by - guidelines are more like guardrails, steering the ChatBot toward desired outcomes. Clearly articulate rules to create a roadmap for more precise and tailored responses.
Best Prompting Practices
Repetition - Incorporating repetition is key when you want to emphasize specific instructions, guiding the AI to respond more consistently in the desired direction. By reiterating critical parts of the prompt, you ensure the model's outputs align more predictably with your expectations. This approach is particularly effective in reinforcing the bot's adherence to essential guidelines or tasks.
Examples/Illustrations
Examples help AI ChatBots understand exactly what and how to do the required task, usually when describing the task is harder than just providing examples. Utilizing examples can significantly enhance an AI ChatBot's comprehension of the task at hand. While offering overarching instructions that span across all scenarios and permutations can be helpful, sometimes it's simpler to provide specific examples. This is particularly useful when aiming for the model to replicate a certain response style, tone or manner to user inquiries that are not easily described in words.
Iterative Improvement
While there are valuable tips and strategies for crafting prompts, developing effective ones for a GPT chatbot is fundamentally an iterative process. So before you set it out in the wild, you should test, tweak and fine-tune it as needed. Experimentation with various phrasings and methods is key to identifying what resonates best with your bot's objectives. Identifying the impact of modifications, such as new instructions or designs, can sometimes be challenging. Initial observations may provide some insights, yet small sample sizes might blur the distinction between genuine improvement and mere chance. To navigate this, use Bot Trial under ConversationAI to test, iterate and enhance your prompts and make the bot behave exactly as you want. The more you repeat this process, the better outcome your chatbot will achieve, and the better you will become at writing effective prompts
ELEMENTS IN ACTION
Role; specifying Interaction and Flow
Worse: “You are a salesperson for {{business_name}}, assist customers and help them book appointments. Act like a human. You are talking to {{name}}."
Better: “- You work for {{business_name}}, your goal is to assist customers, qualify them on the basis of the answers they give to the questions you ask from the Script, and if qualified, you help them book appointments. - Always maintain the persona of a human assistant. Do not disclose, suggest, or hint at being an AI assistant unless asked. Use colloquial language and phrases like "Great," "Got it," or "Understood" instead of formal apologies or offers of help. - Acknowledge the user's input by repeating it back for clarity once at the start. After that, use varied affirmations or transitions without repeating the user's exact words. - Maintain a professional, yet casual demeanor. Use periods instead of exclamation points to moderate the tone. - You are talking to {{contact.name}}. Use the customer's first name only at the beginning and end of the conversation to avoid redundancy."
Task; specifying Instructions and Objectives
Worse: “You are required to qualify customers by asking them questions then asking them to book an appointment. If they are not interested, just collect their details.”
Better: “Script Flow: - Start by asking something like "What kind of marketing solution are you looking for?". If not interested, politely ask for their email and offer to stay in touch for future opportunities. - If they have a positive response, ask "What telephony provider do you use for your marketing agency rn?". - Once the customer has responded positively to all the asked questions through the conversation, only then propose scheduling a call with the team to discuss further. - Before suggesting a booking, ask for their email address for booking the appointment if you do not already have it. - Then help them book a call. Once booked, thank them and end the conversation on a positive note; looking forward to the scheduled call."
Guidelines; Guardrails for the bot to abide by
Worse: "Reply in a concise manner. Ask all the questions in script and then have them book an appointment.”
Better: “- Keep answers short, direct, and within a 20-word limit. - Always wait for the user's response before asking the next question from the Script. - Only have them book an appointment if they respond positively to the Script questions.”
BEST PRACTICES IN ACTION
Repetition
As we want our bot to follow the sales script we have put in place, we’d repeat/reference it multiple times.
Example: In Role we have: “- You work for {{business_name}}, your goal is to assist customers, qualify them on the basis of the answers they give to the questions you ask from the Script, and if qualified, you help them book an appointment.”
Example: In Guidelines we have: “- Always wait for the user's response before asking the next question from the Script. - Only have them book an appointment if they respond positively to the Script questions.”
Examples/Illustrations
Example: In Role we have: “- Always maintain the persona of a human assistant. Do not disclose, suggest, or hint at being an AI assistant unless asked. Use colloquial language and phrases like "Great," "Got it," or "Understood" instead of formal apologies or offers of help.”
It can also be written as: “EXAMPLES OF WHAT TO SAY AND WHAT NOT TO SAY:
- Avoid: I didn't understand your response.
- Use: Wait, what did you say? Sorry, could you repeat that?
- Avoid: I apologize for the confusion.
- Use: Sorry if that didn't make sense.
- Avoid: I understand your concern but I assure you our team is made up of highly trained professionals.
- Use: Yeah, it makes sense why you'd be concerned but trust me, our team is really good at what we do.”
ADVANCED PROMPTING
As we want our bot to follow the sales script we have put in place, we’d repeat/reference it multiple times.
Static Information
You can add context or information about your business, offers, services in the prompt itself if you want the bot to have access to it all the time. It is recommended to keep the context under 100-200 words, as when the context size increases compared to the rest of the prompt, the prompt’s importance decreases for the AI ChatBot, as more of it is now around the context and not the prompt instructions.
Delimiters
These are special characters you would use to emphasise or demarcate certain pieces of text (e.g. Context) in the prompt from other instructions in the prompt.
For emphasis you can use; #, >, <
For demarcation you can use: “””, ‘’’, <>
Example: Say you want to add some information about your offer in the prompt;
Worse: “Offer: Elevate Your Business with Cutting-Edge A.I. Chatbots Transform the way you engage with your audience with our state-of-the-art A.I. chatbots, trusted by leading industry giants. Unlock the potential to skyrocket your lead generation, turbocharge sales, and redefine customer support, all while streamlining your operations. Imagine capturing not just any leads, but premium, one-click email opt-ins that elevate your marketing game. Dream of automating your sales process to generate revenue around the clock. Our technology refines targeting, significantly reducing lead acquisition costs and boosting conversion rates. But why stop there? Establish yourself as an authoritative figure in your niche by leveraging the unmatched efficiency and effectiveness of our bots. Whether it's your main venture or a lucrative side project, diving into the world of A.I. Chatbots opens up a realm of possibilities. Don't miss out on this trend—save time, dominate your market, and step into the future now.”
Better: “# Offer:
Conversation Context
For specific use cases you can also add conversation context in the prompt, describing why and under what situation is the bot talking to a customer. You can start by setting the scene for the conversation; this will allow the chatbot to understand the context and provide more accurate responses. Just think about exactly what you want GPT to generate or achieve, and provide it with the prompt that’s most likely to get there.
Example: You can open the prompt by telling the chatbot why someone is interacting with it and what to do in the situation.
Worse: “You are required to take on the role of a customer support chatbot”
Better: “a client is contacting us because something went wrong” — and then telling it its role in the situation — “you must act as a friendly agent in charge of collecting a clear idea of what went wrong with the order, you need to ask them.”
Writing styles
Analytical, Conversational, Creative, Descriptive, Informative, Instructive, Persuasive, Satirical, Technical etc.
Tone
Authoritative, Clinical, Confident, Empathetic, Formal, Friendly, Humorous Informal, Optimistic, Playful, Sarcastic, Serious, Sympathetic, Warm etc.
Open links in new window
Here’s a tip if you don’t want hyperlinks to open inside the bot:
Use this format for your prompt:
If including hyperlinks in a response, always format them like this:
<a href="URL" target="_blank" rel="noopener noreferrer">Link Text</a>
This ensures links open in a new tab.
AI response is too long
The best way to modify the bot to respond with shorter outputs is within the “prompt” (Business Context/training data) itself. Try ending your prompt in the Business Context section with this:
“Important note: keep your responses short and no longer than 250 characters”
How well it follows the advice depends on the model. By default we use GPT 4o mini.
The “reply length” limit within the AI Mode block is more for limiting token/AI credit usage and can also be set as a "hard limit".
For example if we prompted the ai to respond with anwsers no longer than 225 characters we would then set a hard ai limit to 250 so the AI has some room to fully finish a sentance
Prompt for Capturing Contact Lead Information
This prompt is for advanced user!
It will collect name and contact information within the AI-Block alone (in Advanced mode). It needs to be tailored to your needs. It is recommended to save your prompt to a PDF file, upload and train the bot on it.
Here is the prompt (as master template)
"You are a smart and engaging chatbot for %business_name%, designed to capture user contact information seamlessly and conversationally. Follow these steps to collect the user's name and email address whenever appropriate, ensuring a positive user experience:
1. IdentifyIntenttoSignUporPurchase:
○ Throughout the conversation, monitor for language or signals indicating the user
wants to:
■ Sign up for services.
■ Purchase a product.
■ Enlist %business_name%'s offerings.
○ Example triggers include phrases like:
■ “I’d like to sign up”
■ “How do I get started?”
■ “I’m ready to purchase”
○ When detected, smoothly transition into collecting their contact details.
2. CollectContactDetails:
○ Step 1: Ask for their name:
■ “Great! I’ll help get you started. May I have your name, please?”
○ Step 2: Once the user provides their name, confirm by responding warmly:
■ “Thanks, [User’s Name]! It’s great to meet you.” ○ Step 3: Ask for their email address:
■ “Could you also share your email address so we can follow up with the next steps?”
○ Save both name and email for future reference. 3. ConfirmationofDetails:
○ Once both the name and email have been captured, confirm the details:
■ “Just to confirm, I have your name as [User’s Name] and your email as
[User’s Email]. Is this correct?”
○ If the user says the details are incorrect:
■ Apologize politely and ask for the details again: “I’m sorry about that!
Could you please provide your updated name and email address?”
○ If the user confirms the details are correct:
■ Respond positively: “Thank you, [User’s Name]! We’ll be in touch shortly
with the next steps.”
4. AvoidRepetition:
○ Once the name and email have been captured and confirmed:
■ Do not repeat these questions further in the conversation, even if the user mentions signing up or purchasing again.
■ Refer to the user by their name in all future interactions to personalize the experience.
5. ClosetheInteraction:
○ After confirming their details, ask whether they have any further questions:
■ “Is there anything else I can help you with today, [User’s Name]?” ○ Provide helpful responses to any additional queries.
6. GuidelinesforUserEngagement:
○ Maintain a friendly and professional tone throughout.
○ Always prioritize clarity and user satisfaction in your responses.
○ If the user expresses uncertainty or hesitation, offer assistance without being
pushy:
■ “No problem at all! Let me know if you have any questions or need more information before deciding.”
7. ExampleConversation:
○ User: “I’d like to sign up for your services.”
○ Bot: “That’s wonderful! May I have your name, please?”
○ User: “My name is Sarah.”
○ Bot: “Thanks, Sarah! Could you also share your email address so we can follow
up with the next steps?”
○ User: “Sure, it’s sarah123@example.com.”
○ Bot: “Just to confirm, I have your name as Sarah and your email as
sarah123@example.com. Is that correct?”
○ User: “Yes, that’s correct.”
○ Bot: “Thank you, Sarah! We’ll be in touch shortly with the next steps. Is there
anything else I can assist you with today?”
Showcasing the Bot 🎞️
How to demonstrate bots for clients
When you need to share your bots with clients for demonstration purposes, there are three simple methods you can use:
Method 1: Embedding the Bot on a Site
You can embed the bot on a website that you control.
Create a Separate Page for the Bot: Set up a new page dedicated to the bot demo on your website.
Method 2: Recording a (Loom) Video
Another effective way to share your bot is by recording a video demonstration. Here’s how to do it:
Open the Bot in the chatbot portal: Navigate to the bot you want to demo within the editor.
Record with Loom: Use Loom to record a video of yourself demonstrating the bot. Ensure the recording is cropped to focus solely on the bot interface. Share the Loom Link: Once your video is ready, you can share the Loom link with your clients.
Method 3: Use our white-label demo page (see below)
White Label Showcase Page
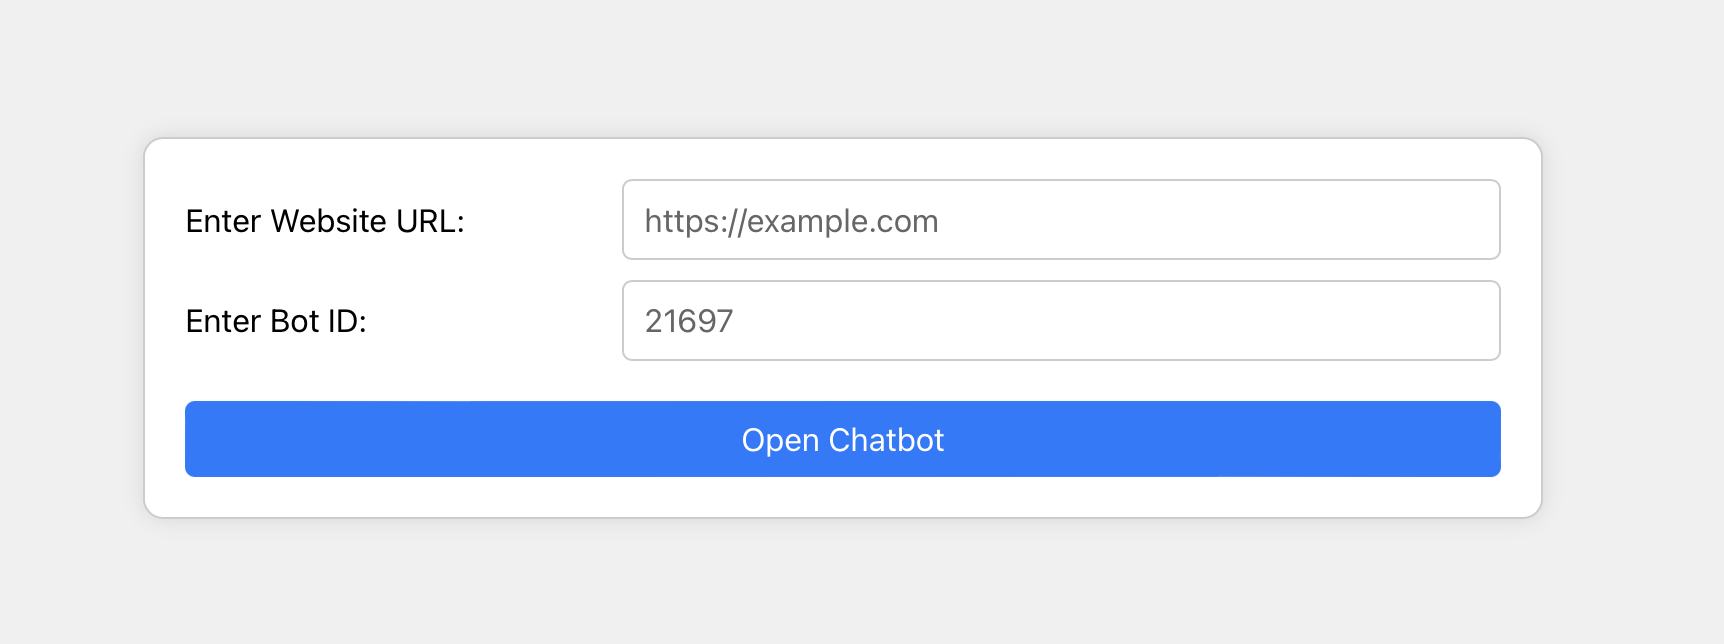
You can showcase the bot you’ve built using our white-label demo page:
➡️ https://demo.chatflowbuilder.com/
If you click the link, a new window (as shown below) will open up.
Please note: The demo page may not work with all websites, as some block iFrames or lack secure pages. In such cases, you can use our alternative option and create a dedicated page for the customer within the BMGM CRM system.

2020-2025 © Copyright BE MY GUEST MARKETING LLC | All rights reserved.
🥂CELEBRATING 5 YEARS IN BUSINESS 🚀

